OramaSearch, a full-text search in your React application

Full Stack Developer and JavaScript and TypeScript enthusiastic.
In some applications, you need to create a full-text search to improve the search of data. In some scenarios, you build this using an API and leave the problem to the backend. But in other cases, you need to guarantee the feature without an internet connection, or you are building a hybrid application, or you need to reduce these kinds of searches directly in the browser to reduce the computation cost in the server. A simple example could be to perform a search on your blog to see which articles respect some criteria.
To do this, in the last period, Orama Search has born. A simple npm library that allows you to create a "small" typed database in your browser (and not only) and exposes a simple method that permits you to search data in this database.
So, in this article, you'll discover how to use Orama Search in your React application and learn how it is easy to integrate it into your next applications.
Before starting a quick explanation of the application, because I don't want to cover all the processes in this article but only the Orama integration.
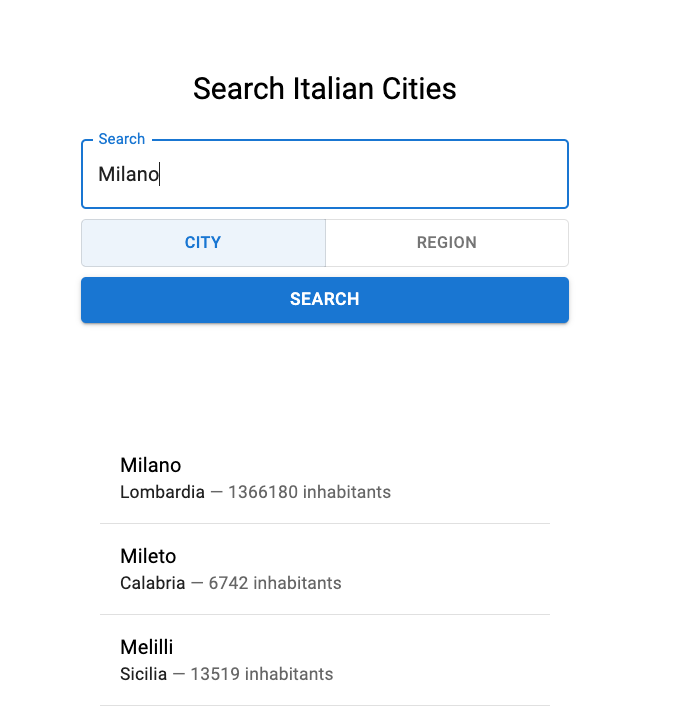
The application is a simple React page where you can search for one or more Italian cities by a term. The terms could search the cities by names or by regions.
The application on startup loads all the possible cities and create an Orama database in the browser. Then you can search using the form the city you prefer.
I wrapped the Orama logic inside of a React Context, and you can interact with it using two hooks.
Here you can find the result
If you want to read this article with the full code of the application, you can find it here.
N.B. in this article, I'll use ni instead of npm, yarn or pnpm, but you can use whichever you prefer without any problems.
Installation
The first step to use Orama in your application is to install it.
It's a piece of cake; in your terminal type:
ni @orama/orama
I think this step doesn't need a big explanation. But this is the door to start using Orama in your application. With this command, now in your node_modules, you can find the Orama packages, and now it's time to start using it!
Create Database
First of all, to use Orama you have to create a database. To do that, Orama exposes a method called create. This method accepts a schema that describes the database structure and some options to configure the database.
For this example, in addition to the schema, I want to show you how you can work with a different language (Italian, in this case) and how you can configure Orama to do that. Orama, to handle this process, uses stemmer out-of-the-box.
So to create a simple database in this case and to move your first steps with Orama, you can go to the folder src/core/useOrama where you'll find all the code to handle Orama in your application.
Let's start from the src/core/useOrama/context.ts file
import { Orama, Schema } from "@orama/orama";
import { createContext } from "react";
import { SchemaToTypes } from "./types";

export type OramaContext<S extends Schema = any> = {
  isCreated: boolean;
  isIndexed: boolean;
  db?: Orama;
  setData: (data: SchemaToTypes<S>[]) => Promise<void>;
};

export const OramaContext = createContext<OramaContext>({
  isCreated: false,
  isIndexed: false,
  setData: async values => undefined,
});
As you can see, the context of Orama for this application is simple. Two flags to understand the status of the database, the database and the setData function to insert the data in the database.
Now you can move to the OramaProvider inside of the src/core/useOrama/Provider.tsx file.
import {
  create,
  insertMultiple,
  Orama,
  Schema
} from "@orama/orama";
import {
  PropsWithChildren,
  useCallback,
  useEffect,
  useMemo,
  useState
} from "react";

import { OramaContext } from "./contex";
import { SchemaToTypes } from "./types";

type IOramaProviderProps<S extends Schema> = PropsWithChildren<{
  schema: S
  options?: Omit<Parameters<typeof create>[0], 'schema'>
}>

export const OramaProvider = <S extends Schema>({ schema, options, children }: IOramaProviderProps<S>) => {
  const [isIndexed, setIsIndexed] = useState(false);
  const [orama, setOrama] = useState<Orama | undefined>(undefined)

  const setData = useCallback(async (values: SchemaToTypes<S>[]) => {
    if (!orama) throw new Error(`Orama database is not created!`)
    setIsIndexed(false);
    await insertMultiple(orama, values);
    setIsIndexed(true);
  }, [orama, setIsIndexed])

  const context = useMemo<OramaContext>(() => ({
    isCreated: !!orama,
    isIndexed,
    db: orama,
    setData
  }), [setData, orama, isIndexed])

  useEffect(() => {
    async function init() {
      const db = await create({
        schema,
        ...(options ?? {}),
      });
      setOrama(db);
    }
    init();
  }, []);

  return <OramaContext.Provider value={context}>{children}</OramaContext.Provider>;
};
In this file, the code starts to be tricker.
First of all, the provider accepts two properties, the Orama schema and the Orama options. Orama uses these properties to create the database for the application.
Then the provider does some little things. First, it initializes two states to save the database and the isInidex flag. This flag is used to understand if the data used for the search are saved in the database. Then the provider creates the setData function used by the application to insert the data in the database. With an effect, it creates the database using the create method exposed by Orama, and then creates and returns the context using a useMemo to improve the performance and the OramaContext.Provider components.
If you are familiar with React and Javascript/Typescript, I think everything is simple and clear after one or two views of the code.
The last step is to render the Provider in the application. This is in the src/App.tsx.
import { createTheme, ThemeProvider } from '@mui/material/styles';
import { stemmer } from '@orama/orama/stemmer/it';


import { CITIES_SCHEMA } from './core/cities/oramaSchema';
import { OramaProvider } from './core/useOrama/Provider';
import Search from './page/Search';

const theme = createTheme();

function App() {
  return <ThemeProvider theme={theme}>
    <OramaProvider schema={CITIES_SCHEMA} options={{
      components: {
        tokenizer: {
          language: 'italian',
          tokenize: stemmer,
          normalizationCache: new Map<string, string>(),
        },
      },
    }}>
      <Search />
    </OramaProvider>
  </ThemeProvider>
}

export default App
Here there are two important things. First, the schema:
export const CITIES_SCHEMA = {
  city: "string",
  lat: "number",
  lng: "number",
  country: "string",
  iso2: "string",
  admin_name: "string",
  capital: "string",
  population: "number",
  population_proper: "number",
} as const;
Second, the Orama configuration. In this case, the configuration imports stemmer and indicates to Orama that the database contains Italian words. Orama works in English by default, but you can use it in other languages. You can find out more in the documentation.
Init Database
To initialize the database, you have to see the src/core/useOrama/useOramaSetData.tsx file.
This file contains the hook that exposes the function to set the data in the database.
This is the code
import {
  Schema
} from "@orama/orama";

import {
  useContext
} from "react";
import { OramaContext } from "./contex";

export const useOramaSetData = <S extends Schema = any>() => {
  const { setData, isCreated }: OramaContext<S> = useContext(OramaContext);
  return {
    canSetData: isCreated,
    setData
  };
};
As you can notice, the hook is pretty simple, get the setData function and the isCreated flag, and exposes them. Here the important concept stands in the Provider file where you defined the setData function.
Let's pick this part of the code again
const setData = useCallback(async (values: SchemaToTypes<S>[]) => {
  if (!orama) throw new Error(`Orama database is not created!`)
  setIsIndexed(false);
  await insertMultiple(orama, values);
  setIsIndexed(true);
}, [orama, setIsIndexed])
In this code, the insertMultiple function is an important concept for Orama. With the insertMultiple function, you can insert an array of rows in your database, and then Orama will use these data for future searches. There is also the insert method to insert only one row per time, but you can find more info here.
Then, it's time to use this method on the Search page to initialize the database with the data.
To do that, go into the src/Search/index.ts file, and you can find the import of the hook and how to use it in an effect.
...
import { useOramaSetData } from '../../core/useOrama/useOramaSetData';
import { getCities } from '../../core/cities/httpCities';
...

export default function Search() {
...
  const { canSetData, setData } = useOramaSetData<typeof CITIES_SCHEMA>();
...

  useEffect(() => {
    if (!canSetData) return;

    async function initDb() {
      const cities = await getCities()
      setData(cities)
    }
    initDb()
  }, [canSetData]);

...
}
Now, your database is ready to perform the searches 🚀
Search in the Database
The core part of Orama is the search! Now it's time to dive into it.
To handle the search, you'll create another hook called useOramaSearch.
The search is pretty simple in Orama. There is a search method that accepts the Orama database, the terms to search and some possible options. You can find more here.
The implementation of the search is this
import {
  Schema,
  search as searchWithOrama
} from "@orama/orama";

import {
  useCallback,
  useContext
} from "react";
import { OramaContext } from "./contex";
import { Results } from "./types";


export const useOramaSearch = <S extends Schema,>() => {
  const context: OramaContext<S> = useContext(OramaContext);

  const search = useCallback(
    async (term: string, properties: string[] | '*' = '*'): Promise<Results<S>> => {
      if (!context.db) throw new Error("Database not ready");

      const { length } = properties;
      const boost = properties === '*' ? {
        city: 2,
      } : properties.reduce((acc, key, index) => {
        const boostValue = (length - index) * 2;
        acc[key] = boostValue;
        return acc;
      }, {} as Record<string, number>);

      const result = await searchWithOrama(context.db, {
        term,
        properties,
        boost
      }) as unknown as Results<S>;

      return result;
    },
    [context]
  );

  return {
    isReady: context.isCreated && context.isIndexed,
    search,
  };
};
There are some interesting points in this code.
As you can notice, the search method accepts the terms and a list of properties.
The first is the search terms that the user wants to search; the second is the list of properties that you want Orama to use during the search (using * Orama searches in all the properties).
There is another strange option called boost in this example. This option is a configuration to indicate to Orama the importance of one or more fields in the search.
The last step is to use this hook in the Search page to run the search.
In the src/page/Search/index.tsx this implementation is done in this way.
...
import { useOramaSearch } from '../../core/useOrama/useOramaSearch';
...

export default function Search() {
  const { isReady, search } = useOramaSearch<typeof CITIES_SCHEMA>();
...

  const onSubmit: FormEventHandler<HTMLFormElement> = useCallback(async (e) => {
    e.preventDefault();
    const form = e.target as HTMLFormElement;
    const searchTerms = form.elements.namedItem('searchTerms') as HTMLInputElement;
    const results = await search(searchTerms.value,
      [searchType]);
    setResults(results)
  }, [search, searchType, setResults])

  ...
}
The last info about the search is the search result. It is composed in this way
elapsed: this object contains the statistic of the search; here, you can find how much time Orama has used to provide the result
hits: this is the list of the elements that respect the search; by default, Orama returns the first ten elements; you can paginate the result, passing the limit and the offset options in the search method.
count: here; you can find the number of elements that match the terms
And perfect now the application is ready to search the cities.
You can test the result here 🚀
Conclusion
As you can notice, integrating Orama into your application is pretty simple.
The project has born some months ago and obviously it is not perfect and with huge features, but it works well, and the team will release many new features in the further future.
All the hooks and the context seen in this article could be early replaced by an npm package called use-orama; it is a working progress 🚧.
And that's all! I hope Orama can help your applications search data quickly in the future, and I think it will become a great product in the next few months!
If you are interested in it, you can learn more about it in the official documentation.
And don't forget to follow Orama on Twitter and Michere Riva its CTO.
🚧
N.b. The project is in beta version at this moment, so breaking changes or some bugs are opportunities to contribute to the project if you want 😎 Here you can find the GitHub Repo
🚧